How to connect your Mini.mu to PureData

I was very fortunate enough to be made one of the prototype versions of Helen Leigh Steer/Imogen Heaps amazing Mini.mu gloves, it uses micro:bit to create a gestural controller and is aimed at getting younger people into the more fun/physical things that coding and tech can do. I’ve been pushing what this little, cheap product can do and have already had great success in connecting it up to physical instruments and puredata.

I struggled getting the micro:bits connecting via radio/serial and into puredata, I definitely couldn’t have managed it using the micro:bits blocks editor which is the easiest/user friendliest way to start coding. So, I found a work around which I thought would be useful for anyone else wanting to connect micro:bits to puredata.

This works with 2 micro:bits, communicating over radio, sending MIDI data into Puredata. This obviously limits you to the range of MIDI values, but is more than enough to get some really great results.

Head here for the code for the microbit connected to your computer: https://makecode.microbit.org/_4hFVXm4zRD85

And here for the code that goes on your gloves microbit: https://makecode.microbit.org/_imoPhUAvzeY5

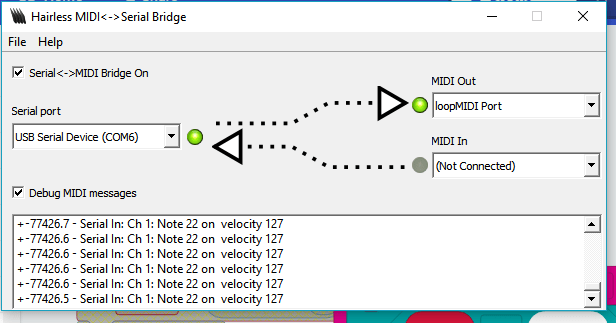
Now, before you open up puredata, you’ll need two more small programmes to make this work. All the documentation for the MIDI library is in here, and it mentions the need for a bridge between serial and our midi devices, so Hairless MIDI is the first thing you need. This converts incoming Serial data into MIDI packages. The second thing you’ll need is loopMIDI, which is a brilliant programme that acts as a virtual connection for MIDI devices. I use this one to make PureData and Reaper talk to each other too.

So, your two other programmes will look like this:

HairlessMIDI
Hairless MIDI
loopMIDI
loopMIDI

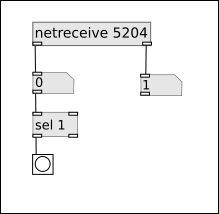
So, now you have all this set up, you can open up puredata, select loopMIDI as a MIDI input device and use [notein] as your method of recieving data.

With each sensor sending data via a different midi channels, you can seperate all the incoming data using the [notein 1] or [notein 2] objects.

MiMuMidiIn

Obviously, you can do whatever you want with the incoming data, and I’ll be posting a few more complex patches soon (once I’ve made them) showing the potential of mini.mu and puredata.

Here is my most recent PureData patch that uses only the glove to control step sequencers, sample playback length and starting position and basic controls like tempo/loop length.


NOTE/UPDATE:

There may be some other issues with connecting things together if you’re on not Windows 10 or on Macs, but thanks to Neill Bogie, there may be work arounds:

Instructions for mac users (LoopMIDI is windows-only, so mac users must enable their IAC Driver):
https://gist.github.com/nbogie/309848134aede2e57ee80a4b752b0294#file-mini-mu-to-pd-on-mac-md

Windows versions prior to windows 10, users will first need to install the mbed windows serial port driver before Hairless MIDI Bridge will see the microbit as a COM port, following these instructions: https://os.mbed.com/docs/latest/tutorials/windows-serial-driver.html … (Making sure to have the microbit connected during install). Source: microbit support https://support.microbit.org/support/solutions/articles/19000022103-how-do-i-use-the-serial-port-with-a-micro-bit-on-windows

Inductive Pendulum

One of my latest ideas is an evolution of my Proximity Mixer that uses Induction and Proximity to transfer audio signals from a source to a pickup through the air. This version uses an inductor on a pendulum with an audio signal running through it, with a stationary pickup on the base that picks up the audio as it swings past:

In this video, Helen Leigh Steer of Do It Kits fame is controlling the pitch being played with her mi.mu for kids project that she is developing with Imogen Heap.

I’m planning on a much bigger array of multiple pendulums all swinging at once which should be interesting to see in action!

Soundcamp Festival and DMSA Students

I had the pleasure recently of leading part of one of the modules for the Digital Music and Sound Arts course at Brighton University thanks to the wonderful Maria Papadomanolaki.

The culmination of which was a collaborative installation build at SoundCamp festival in London. I had a lot of fun with the build and hopefully the students learnt some stuff along the way! We had capacative copper pipes on the end of sticks as a keyboard that triggered either randomised sequences, tempo changes or one-hits on a pure data patch on a raspberry pi that connected to my DADA machines Automat. We could have done lots more with more time/planning but the end result was pretty great for a one day, from scratch build!

Tubular Solenoid Bells

My latest creation is a solenoid driven tubular bell rig, made from copper pipe and scrap wood. The assembly is collapsable and houses the solenoids that come with the DADA machines Automat kit.

It’s going to be a very versatile instrument played by many different methods, I can hook it up to my Hummingbird installation and have you play it via twitter, I can hook it up to a BreConductive board and use conductive ink  as a proximity trigger. So far i’ve used it with Helen Leigh’s mi.mu glove project that replaces that incredible tech within the mi.mu gloves with the 8-bit Micro:Bits. So in this demo, the angle of the hand/glove determines which bell gits struck:
.

I’ve also used it with wonderful effect with Dom Aversanos Pure Data patch on Church Bell ringing algorithms. Dom is a wonderful percussionist who you should go check out right now.

Connecting Raspberry pi and PureData

During one of my most recent events, I needed to connect PureData on my Raspberry Pi up to a physical switch to toggle a Bang event. For those that don’t use Raspberry Pi or PureData that probably sounded like gobbledegook.

The Raspbery pi is:

a series of small single-board computers developed in the United Kingdom by the Raspberry Pi Foundation to promote the teaching of basic computer science in schools and in developing countries.

It’s a brilliant and affordable way to control projects and interactive installations and all sorts. It’s the brains behind my Hummingbird  installation and I’ve been using it in conjunction with PureData to do a lot of the maths for some projects too.

PureData is:

a visual programming language developed by Miller Puckette in the 1990s for creating interactive computer music and multimedia works.

It’s a really easy way to get into controlling any complex bits of a project you might need and you don’t need to code to do it! It’s all based on visual commands with connecting lines and boxes and whatnot. I’d highly recommend playing around with it, it’s a lot of fun and even with basic knowledge of how it works you can pull off some great ideas. And, what’s great, is that Raspberry Pi is powerful enough to run PureData so you can have it running on a teeny tiny board and massively cut down any bulk to a project that may have otherwise needed computers to function.

SO, I needed a physical switch on my Hummingbird to trigger a simple Bang object in Puredata. There are a few bits online about how to do this, but none of them worked for me and some of the links ended up in dead ends and 404s. So, my work around, was to use another programme called Processing to set up a netsend/netreceive communication within the raspberry pi.

I do not claim to be an expert, and there are probably easier ways and more efficient ways to get this to happen, but for now let me share how I managed it.

In Processing, I had this code running, with a physical switch between GPIO pin 4 and Ground.

import processing.net.*;
import processing.io.*;
Client myClient;
Server myServer;
int val = 0;
int bang = 0;
void setup() {
  GPIO.pinMode(4, GPIO.INPUT);
  // Starts a myServer on port 5204
    myClient = new Client(this, “127.0.0.1”, 5204);
}
void draw() {
  // sense the input pin
  if (GPIO.digitalRead(4) == GPIO.HIGH) {
    bang = 0;
  } else {
    bang = 1;}
{
myClient.write(bang +”;”);
}}

And then, within Puredata, I had a netreceive object for the same Port as listed in the Processing code (5204):

netrecieve

This meant, whenever the switch was closed, the code in Processing read this as HIGH and then sent a number 1 via netsend/netreceive on port 5204 which puredata then used the sel 1 command to trigger a bang!

If you want send send other values i’m sure it’s possible too, the only thing i’d say is it’s important to include the + “;” when you send data as this is what the programmes use to determine when the message has ended.


Mini Dronemachine 

This is probably the quickest build of a Dronemachine I’ve managed! I was being interviewed for a mini Hackoustic documentary and realised I had no dronemachines of my own to show! So this was a very rushed build but had remarkably good sounds at the end!

Made from the motor coil of an electric fan, an electric toothbrush motor, bike brake-cable strings and washers and bolts as tuning pins.

Hackoustic in Electronic Sound magazine!

We were very privileged to have been interviewed and photographed by the amazing Electronic Sound magazine during our recent #HackousticVillage festival .

The magazine is fantastic and the article they wrote about us at Hackoustic is a hugely positive and a wonderful piece. I would scan the article for you to read, but I would seriously advise you to buy a copy for yourself!

 ES